Connect the Ethernet Cables and Set IP Addresses
After the software are installed, insert the Ethernet cables into the Ethernet ports of the IPC, and then set the IP addresses for the camera, IPC, and robot. The following two pairs of IP addresses should be in the same subnet:
The camera IP address and the IP address of the IPC Ethernet port connected to the camera
The robot IP address and the IP address of the IPC Ethernet port connected to the robot controller
Hint
The IP addresses of the IPC Ethernet ports should not be in the same subnet.
Please set the IP addresses of the IPC Ethernet ports first before setting the IP addresses of the camera and robot, to avoid the case where the IP addresses of the IPC Ethernet ports cannot be set successfully.
If the IPC does not have enough Ethernet ports, use a Gigabit Ethernet network switch for connection.
Follow the steps below to connect the Ethernet cables and set the IP addresses.
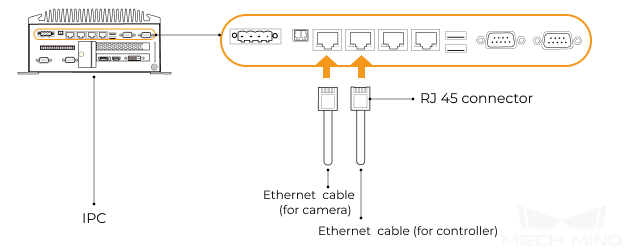
Insert the RJ45 connector of the camera Ethernet cable into the Ethernet port of the IPC. Please refer to Connect the Ethernet Cable for more information.
Set the IP address of the IPC Ethernet port connected to the camera. Please refer to Set IP Address on IPC for more information.
Insert the RJ45 connector of the Ethernet cable of the robot controller into the Ethernet port of the IPC. Please refer to Connect the Ethernet Cable for more information.
Set the IP address of the IPC Ethernet port connected to the robot controller. Please refer to Set IP Address on IPC for more information.
Check the network connectivity between the IPC and the camera/robot.
Connect the Ethernet Cable
Insert the RJ45 connector of the Ethernet cable into the IPC Ethernet port.
Set IP Address on IPC
Start the IPC and go to .
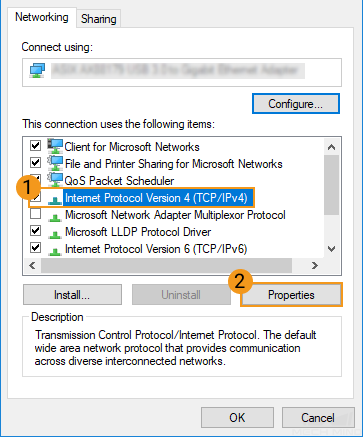
Right-click the Ethernet port connected to the camera/robot, and select Properties.
In the pop-up window, click Internet protocol version 4 (TCP/IPv4) and select Properties.
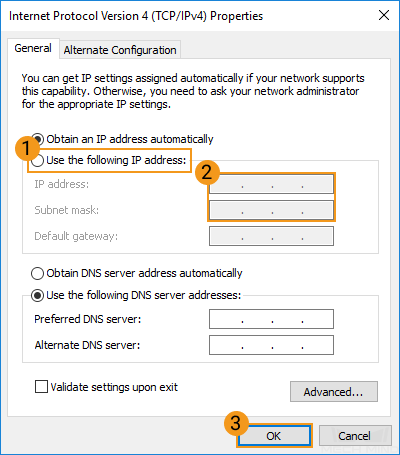
Select Use the following IP address, and set the IP address and subnet mask according to your actual needs. Then, click OK to save the changes.
Hint
The IP address must be unique.
The subnet mask is usually 255.255.255.0.
Hint
Rename the Ethernet ports connected to the camera and the robot for easy recognition: right-click an Ethernet port and select Rename.
The IP addresses of the IPC Ethernet ports should not be set in the same subnet, otherwise IP address conflict may occur.
Set Camera IP Address
Run Mech-Eye Viewer on the IPC.
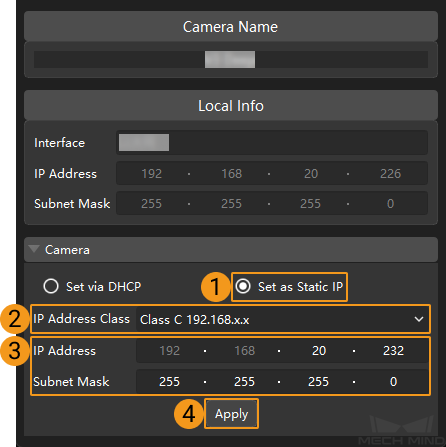
Hover the cursor on the camera for which you’d like to set the IP address. Click
 to open the window for IP address configuration.
Select Set as Static IP, and select the IP Address Class according to your actual situation. Then, set the IP address and subnet mask for the camera and click Apply.
Hint
The IP address must be unique.
The Local Info section displays the IP address and subnet mask of the IPC network interface card connected to the camera. You can set the IP address and subnet mask of the camera according to the information displayed here.
Set Robot IP Address
Please follow the robot’s user manual to set the robot IP address.
Check the Network Connectivity between the IPC and the Camera/Robot
After setting the IP addresses of the IPC, camera, and robot, please check the network connectivity between them by following the steps below.
Press Window + R to open the Run dialog box.
Type cmd and click OK.
Type ping XXX.XXX.XX.XX in the command prompt window. Press Enter to run the command.
Hint
Replace XXX.XXX.XX.XX with the actual IP address of the camera/robot.
Check the returned messages of the command and see whether the IPC can communicate with the IP address successfully.
If the communication is successful, the following messages will appear.
Pinging XXX.XXX.XX.XX with 32 bytes of data:Reply from XXX.XXX.XX.XX: bytes=32 time<1ms TTL=128Reply from XXX.XXX.XX.XX: bytes=32 time<1ms TTL=128Reply from XXX.XXX.XX.XX: bytes=32 time<1ms TTL=128Reply from XXX.XXX.XX.XX: bytes=32 time<1ms TTL=128If the communication is unsuccessful (likely due to IP address conflict), the following messages will appear. Please set a different IP address for the camera/robot.
Pinging XXX.XXX.XX.XX with 32 bytes of data:Reply from XXX.XXX.XX.XX: Destination host unreachable.Reply from XXX.XXX.XX.XX: Destination host unreachable.Reply from XXX.XXX.XX.XX: Destination host unreachable.Reply from XXX.XXX.XX.XX: Destination host unreachable.