Connect to Camera and Set IP Address
The camera must be in the same subnet as the IPC for the camera to be connected in Mech-Eye Viewer.
By default, the IP address of a camera is automatically assigned via the Dynamic Host Configuration Protocol (DHCP). If this meets your needs, you can connect to the camera directly.
If you need to set a static IP for the camera, please check the instructions in Set IP Address of Camera below.
Connect to a Camera
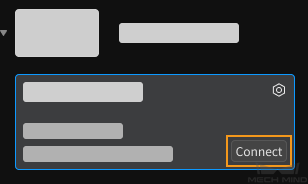
All the detected cameras are shown in the Camera List when you open Mech-Eye Viewer.
Select a camera and click Connect to connect to the camera.
Attention
For the camera to be connected in Mech-Eye Viewer, the camera firmware’s version must be consistent with Mech-Eye Viewer’s version. If not consistent, you will be prompted to upgrade the firmware with the Camera Firmware Upgrade tool.
For the very first time that the camera is connected to the IPC, it may take up to a few minutes for the camera to show up in Mech-Eye Viewer.
If Connected is displayed in the camera info card, the camera is already connected to a GenICam client. To connect the camera to Mech-Eye Viewer, please disconnect the camera from the GenICam client first.
Set a Custom Camera Name
After the camera is connected to Mech-Eye Viewer, you can set a custom camera name that is easy to recognize.
In the camera toolbar, click ![]() or Set camera name to enter a name for the camera.
or Set camera name to enter a name for the camera.

Note
The following characters cannot be used: \, /, :, *, ?, ", <, >, |.
This function is unavailable for a virtual camera.
Set IP Address of Camera
Open Mech-Eye Viewer and select the camera for which you’d like to set the IP address. Click
 to open the IP configuration window.
Select Set as Static IP, and select the IP Address Class according to your actual situation. Then, set the IP address and subnet mask for the camera and click Apply.
Hint
Record the set camera IP address for future reference.
The Local Info section displays the IP address and subnet mask of the IPC network interface card connected to the camera. You can set the IP address and subnet mask of the camera according to the information displayed here.
To switch back to automatically assigned IP address, select Set via DHCP.
Set IP Address on IPC
Go to .
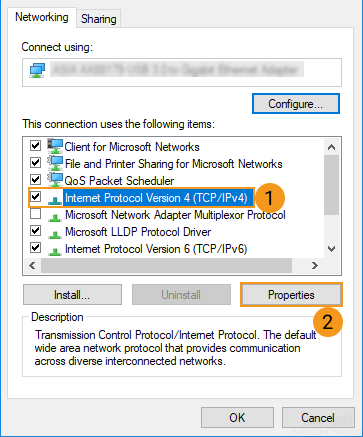
Right-click the network interface card connected to the camera, and select Properties.
In the pop-up window, click Internet protocol version 4 (TCP/IPv4), and select Properties.
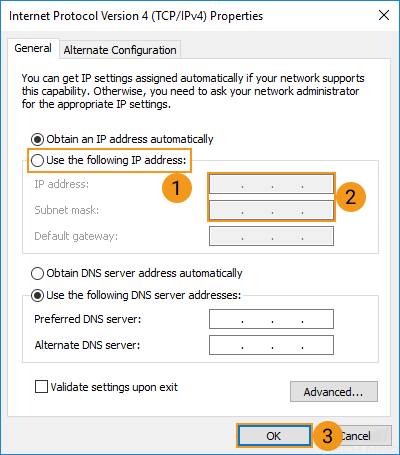
Select Use the following IP address, and set the IP address and subnet mask according to your actual needs. Then, click OK to save the changes.
Once you are connected to a camera in Mech-Eye Viewer, you can start capture images.
The next topic introduces the actions for capturing images and viewing the obtained data.